
The ULTIMATE Guide to Screen Record or Stream your DAW – FOR FREE

In this tutorial we’ll see how to stream or screen record your DAW for free using Voicemeeter Potato & OBS Studio or Streamlabs OBS.
You’ll be able to route your DAW audio into OBS, including the audio from plugins, and you’ll be able to use the inputs of your audio interface. We’ll go step-by-step, from start to finish.
Watch the full video below.
Download the Software
We’ll use Voicemeeter Potato to route all of our audio, and OBS Studio or Streamlabs to record the screen and audio. All of the software is free.
Install all the software and restart the computer.
Initial Voicemeeter Potato Setup
Open Voicemeeter Potato, and set a hardware output for A1. This is so we can hear audio. Set an ASIO device for the A1 output. You will hear audio from this device when you activate the A1 button on a track.
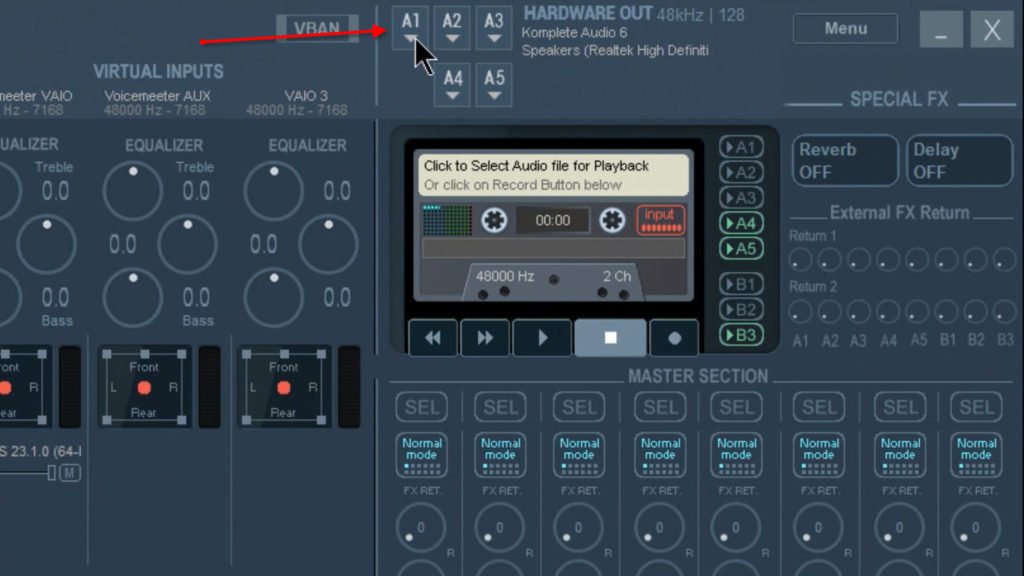
You can set other outputs sources from A2 to A5. For example, you may want to hear audio from your computer speakers. So set that on A2 for example. Most of the time you’ll try the WDM driver first, but I’ve found that for my system the MME driver works better. You’ll have to experiment with your specific system and devices.
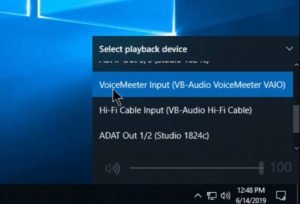
Next, set the Playback Device for Windows. Left click the Speaker icon in the tray, and select ‘Voicemeeter Input – VAIO’
Playback a media source on your computer, like a YouTube video, and you’ll see the input in Voicemeeter. Activate an output to hear the audio from the device you prefer. If I select A1, I’ll hear the audio from headphones or speakers connected to my audio interface. If I select A2, I’ll hear the audio from my computer speakers. Or even do both at the same.
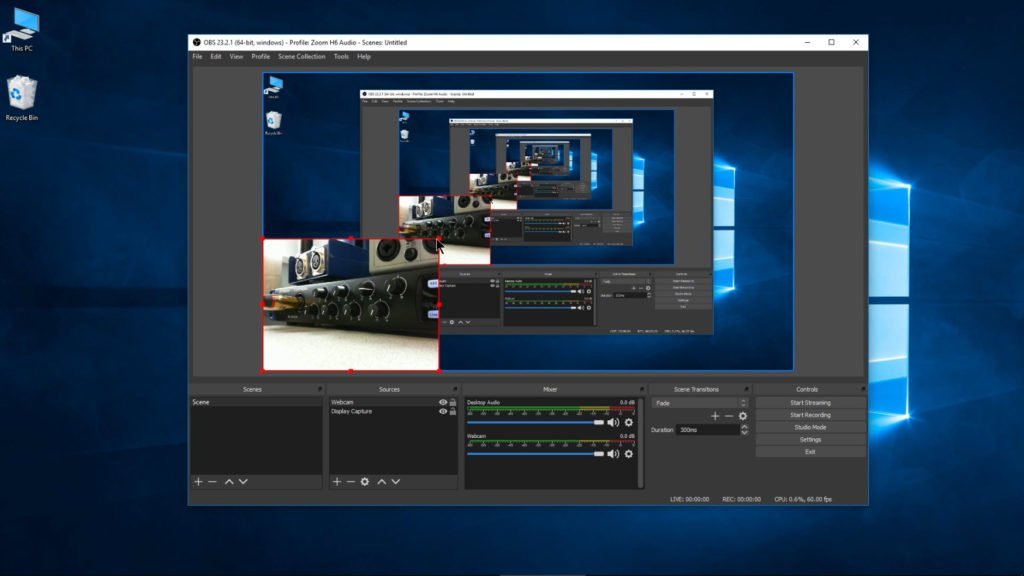
Initial OBS Studio Setup
Open OBS Studio and create a ‘Display Capture’. If you have more than one monitor connected, select the one you wish to capture. Make sure you capture the cursor if you are doing tutorial videos.
Click the gear icon for the Desktop Audio track and select Properties. Make sure this is set to Default. Default refers to the playback device for Windows.
Playback some media on your computer. Such as a video in VLC Media Player. You can see the audio input into OBS.
OBS Studio Settings
Before we connect Voicemeeter Potato to our DAW, we’ll check out the video and audio settings I use in OBS or Streamlabs. If you are already familiar with OBS, feel free to skip this part.
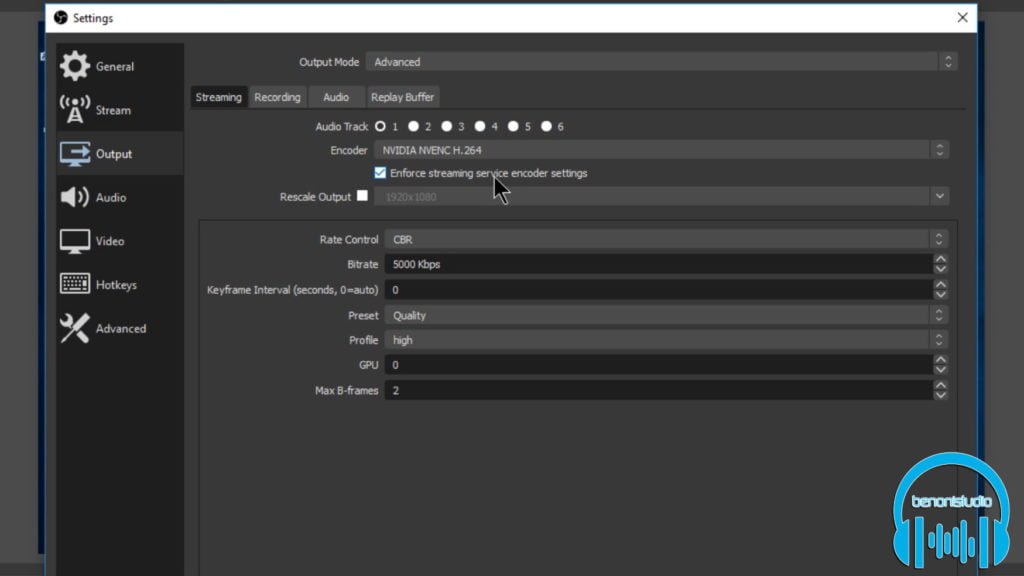
Go to Settings and Output. Change the mode to Advanced.
On the Streaming tab set the Audio Track to 1. In general, when streaming you can only transmit one Stereo audio track.
Your encoding options will depend on your hardware, so you’ll have to see what works best for you.
If you want to stream in a lower resolution, you can rescale here.
I set my Rate Control to Constant Bit Rate, but you can try others.
And the Bitrate will depend on your internet upload speed. So do a test stream and adjust. You can play around with these other settings as well.
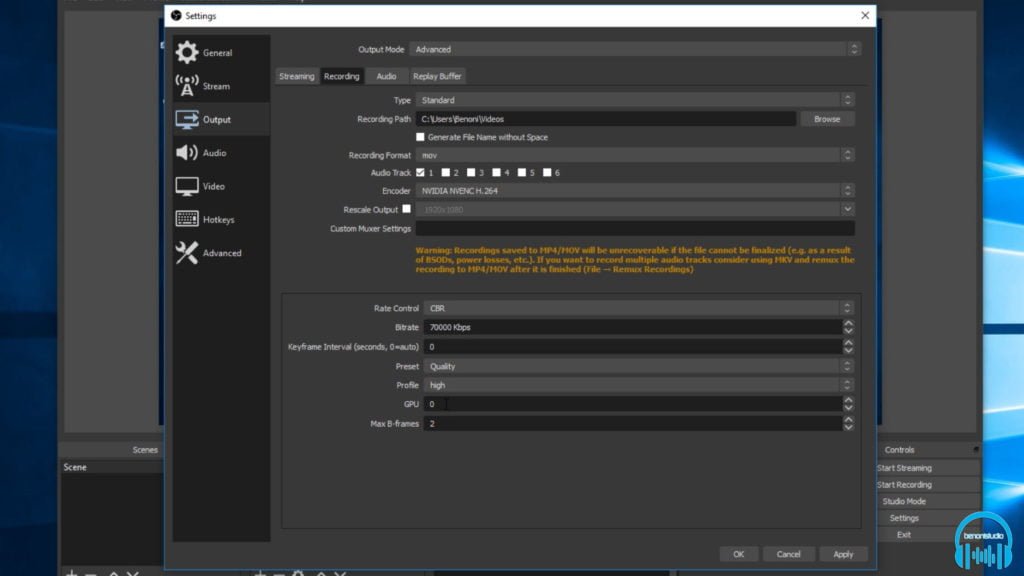
Under the Recording tab
You can change the path the video will be recorded to. And by the way, Streaming and Recording are independent. You can just stream, just record, or stream and record at the same time.
For Recording Format, in general, set it to mp4 or mov. You could use other formats if you wish. I usually use mov since I edit the footage in Media Composer.
We’ll come back to the Audio Track settings later.
Your encoder settings will depend on your system. I prefer the Nvidia option, but you’ll have to test what works on your system.
Usually, you won’t want to rescale the output, so leave that unchecked.
I set my Rate Control to Constant Bit Rate.
And the Bitrate setting can be between 1000 and 10000. Usually around 7000 will be more than enough to have the highest quality and moderate file size.
If you are recording with 60 frames per second, and you don’t mind big files, you can jack this up to 20000 to 70000, though you won’t notice much if any improvements in general. You’ll have to test this for yourself. Start with 5000 and work your way up.
For Preset I use Quality or Max Quality
Profile is High
GPU is 0, if you have multiple GPUs you can switch that here. 0 is the first GPU, 1 is the second, etc…
Max B-Frames is 2.
Under the Audio tab, set everything to the highest setting
Apply your changes.
Click Audio on the side-bar
Change the Sample Rate to 48k. 48k is the standard for video sound.
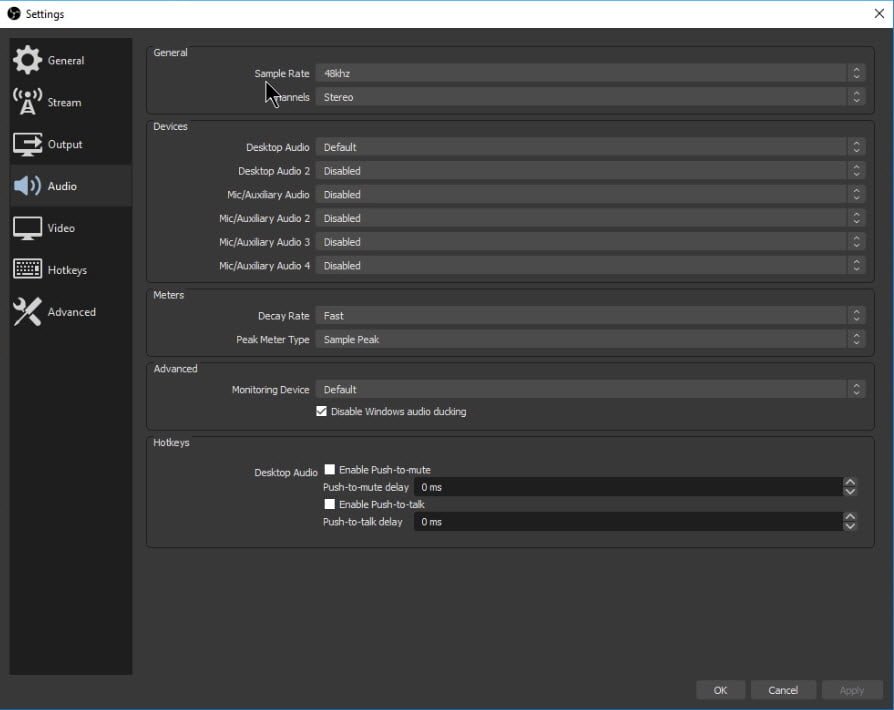
If you have problems with 48k, right click the Speaker icon in Windows and choose Sounds. Under the PLAYBACK tab find the devices you are using, right-click and choose Properties. Under the Advanced tab make sure the device is set to 48k. Do this for each device. Then go to the Recording tab, and do the same for each device you want to use.
Back in OBS, set your channels to Stereo.
You can mess with the other settings once you’re more familiar with OBS. Just make sure Desktop Audio is set to Default.
Apply your changes.
Click VIDEO in the sidebar.
Usually, you won’t need to change the first three settings.
For Frames Per Second choose Common FPS.
From the drop-down choose either 30, 48, or 60. In general, 30 fames per second is what you will choose and is more than enough for tutorial videos.
If you choose 48 or 60, the demand on your computer will be higher and your video file will also usually be larger. Most videos you see on YouTube are between 24 and 30 fps. The video you’re watching now is 60 frames per second. Choose which ever you prefer.
Apply your settings.

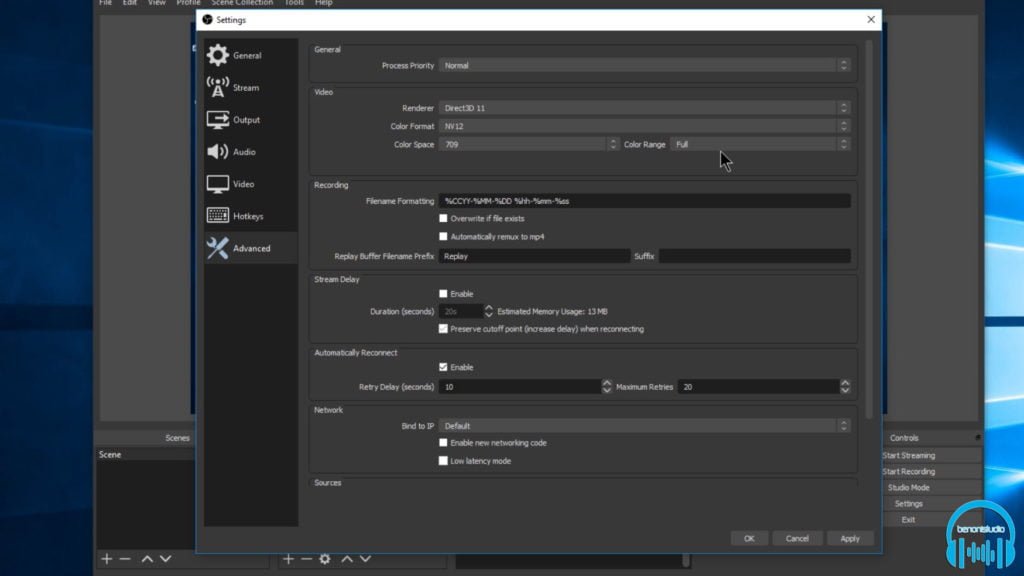
Click ADVANCED in the side bar.
You probably won’t need to change any of these settings.
But here’s what I use, Process Priority is Normal
Renderer is Direct3D
Color Format is NV12
Color Space is 709
Color Range is Full.
If you’re video looks too dark, or the colors are wrong, change Color Range to Partial.
Apply your settings. And click OK.
If you want to record a webcam at the same time, create a Video Capture Device in OBS and select your webcam. Then place it where you want.
If you’re sitting in front of a green screen, right click the Webcam Source and choose Filters.
Under Effect Filters, add a Chroma Key and adjust your settings.
If you’re Streaming, head to Settings > Stream and setup your account for the service you want to use. Again, I usually use Streamlabs for streaming, and everything I’ve shown you in OBS applies to Streamlabs. So be sure to adjust your settings in Streamlabs if the defaults are not working.
If you only have one computer monitor, be sure to minimize OBS after you start recording. You can always access it from the task bar or the tray.
You can even setup Keyboard shortcuts to start or stop recording.
OBS Studio is now setup and ready to record or stream.
Setup Voicemeeter Potato w/DAW
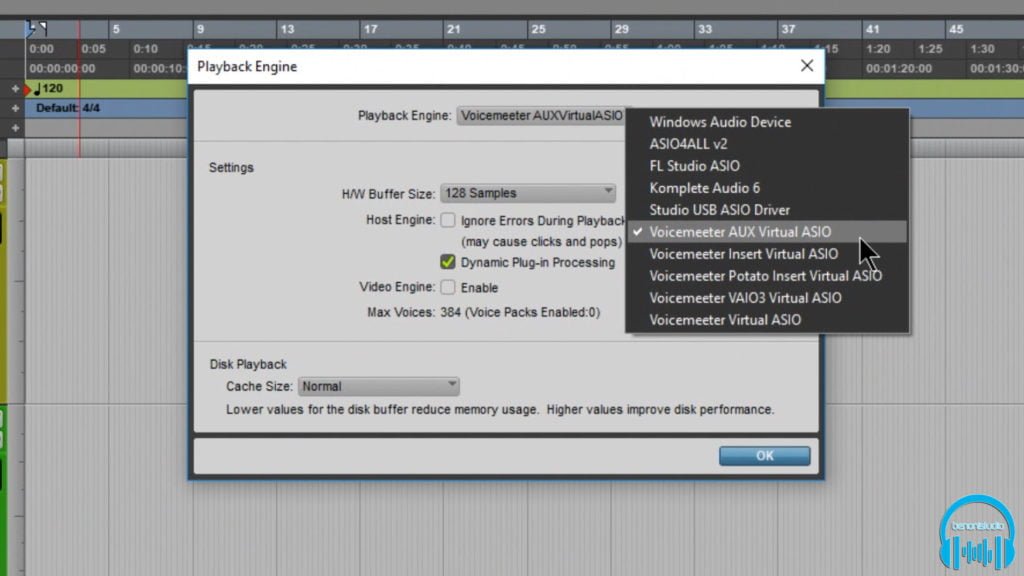
Open your DAW, we already have a 48k session open in Pro Tools. We need to connect our DAW to Voicemeeter.
In Pro Tools, go to Setup, Playback Engine, and select Voicemeeter Aux Virtual ASIO. I’ll assume you know how to change the Playback Engine for your DAW.
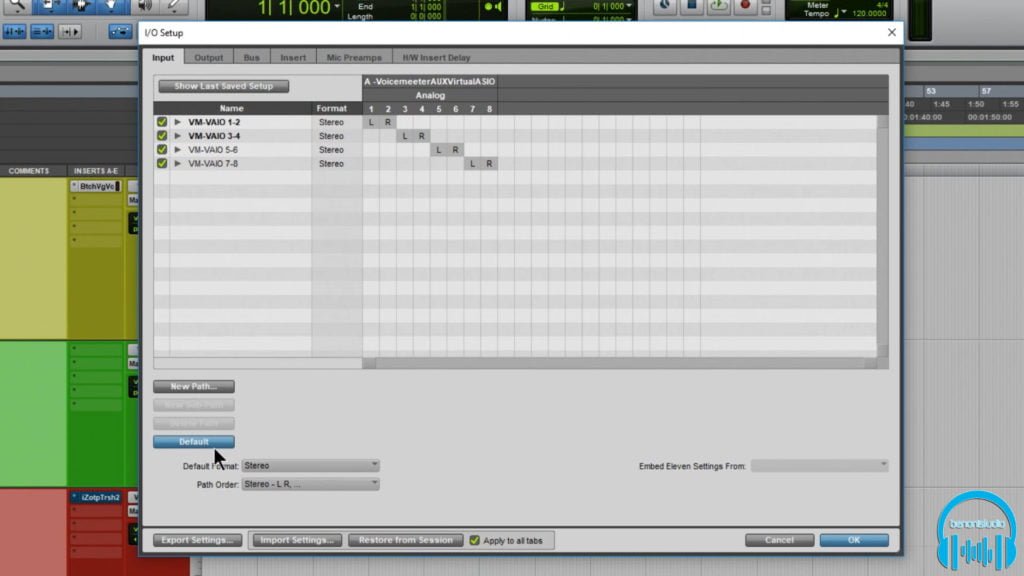
You may need to default the IO if it’s not correct for your tracks. In Pro Tools we go to Setup > IO and click default for the Input, Output, and Bus tabs.
Playback some audio or a Virtual Instrument in your DAW.
You’ll now see the input in Voicemeeter.
To hear the audio from your DAW, activate one or more of the Hardware outputs we setup earlier. This audio includes everything that’s going on inside your DAW, including any plugins or virtual instruments.

BASIC: Record DAW Audio In OBS
If you’re not planning on using the inputs of your audio interface, we can go ahead and send this audio into OBS.
In OBS, create an Audio Input Capture. Name it DAW Audio.
From the drop down choose Voicemeeter Aux Output.
Playback audio in your DAW. You won’t see any input yet in OBS. Bring up Voicemeeter and activate B2 under Voicemeeter Aux. Now you’ll see your DAW audio in OBS.

ADVANCED: Record DAW Audio In OBS
If you intend on using the inputs of your audio interface, we’ll have to change some settings, otherwise you’ll get a feedback loop.
Let’s delete the DAW Audio track in OBS.
And de-activate B2 in Voicemeeter.
Go to Menu and System Settings/Options in Voicemeeter

Look for ‘PATCH ASIO Inputs to Strips’
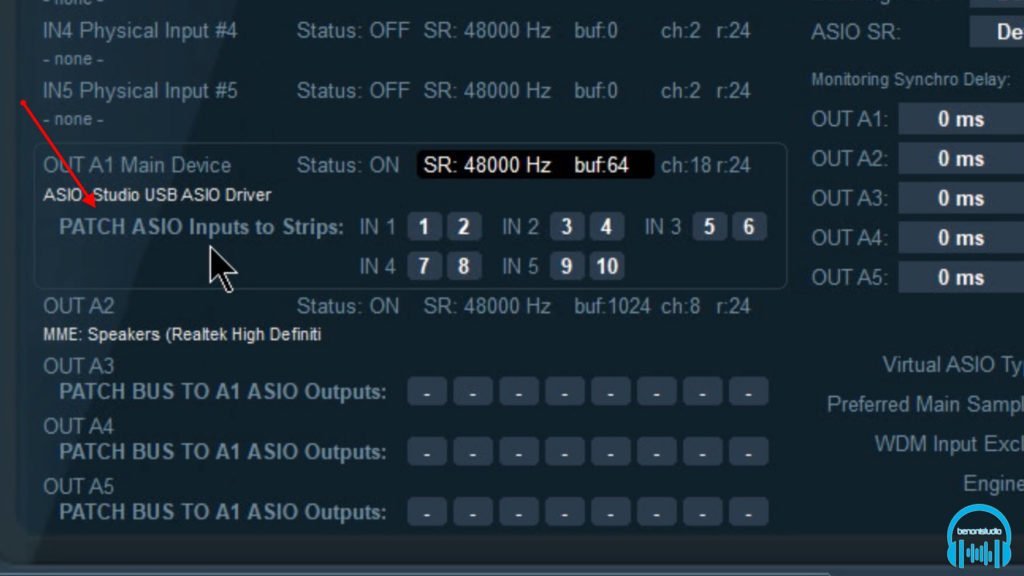
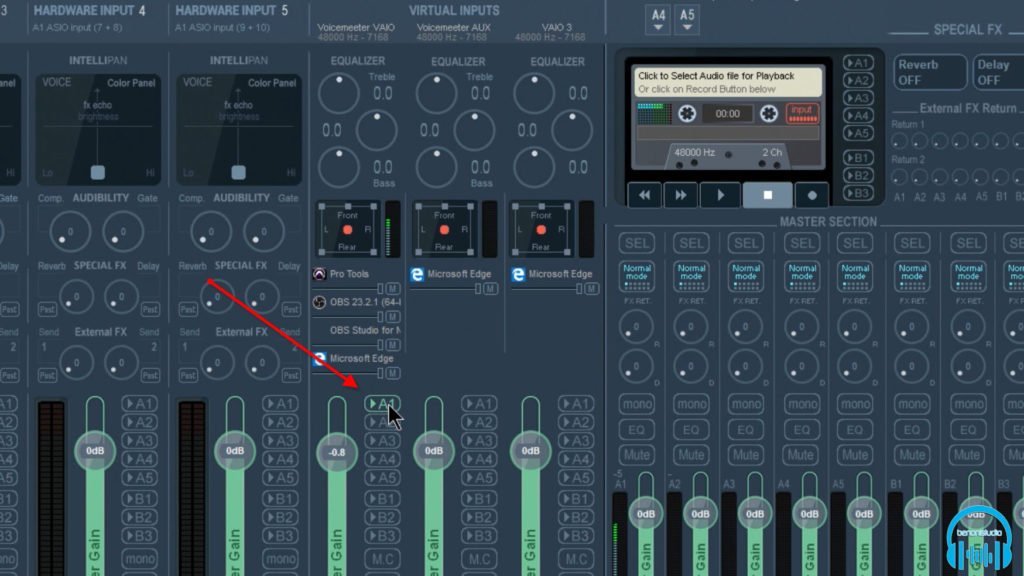
Since for this example we want to use a microphone and a guitar run through Pro Tools we’ll switch In 1 to 1 with nothing for the right stereo channel. And for In 2 we’ll select 2 for the right and nothing for the left side. Just left click to increase the number and right click to decrease the number. You could set 1 & 2 for input 1, but we have more options this way. Set the rest of these to nothing, for our example.
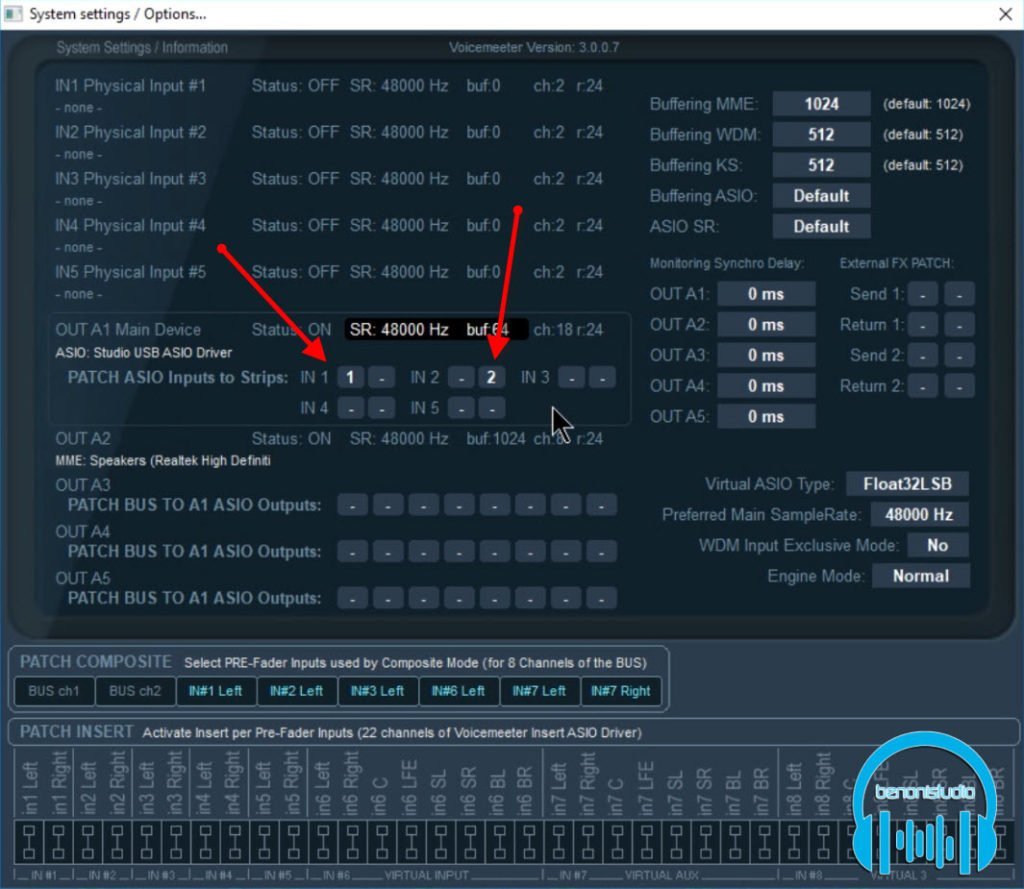
Make sure nothing is selected for Hardware Inputs 1 & 2. Remove the device if something is already set. Once removed, the input will default to the ASIO inputs we just setup. Make sure nothing is selected for channels 3 thru 5.

I’ll plug in a microphone to input 1 and a guitar to input 2 of our audio interface.
In your DAW, create 2 Mono audio tracks. Set the input of the mic track to VM-VAIO 1, and the input of the Guitar track to VM-VAIO 2

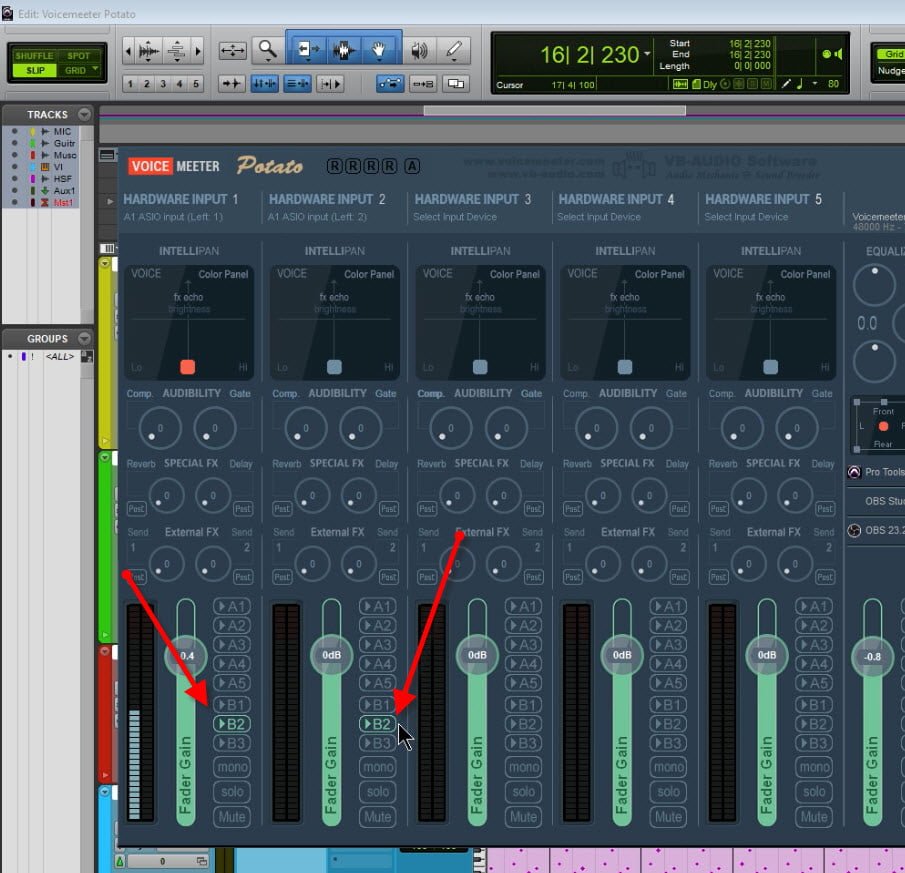
In Voicemeeter, send the Mic track to B2, we’ll also send the Guitar track to B2.
Input monitor the Mic track in Pro Tools and you’ll see the input.
Because we want to monitor the microphone through Pro Tools, do not activate any hardware outputs for the mic track or guitar track in Voicemeeter. Instead, monitor through the DAW track, which is, again, Voicemeeter Aux.
Add any plugins you wish to the mic track in your DAW to use them in real time.
You can even add a guitar amp plugin to the Guitar track.
Since we’re monitoring through the DAW, make sure your buffer is as low as it can be without introducing problems.
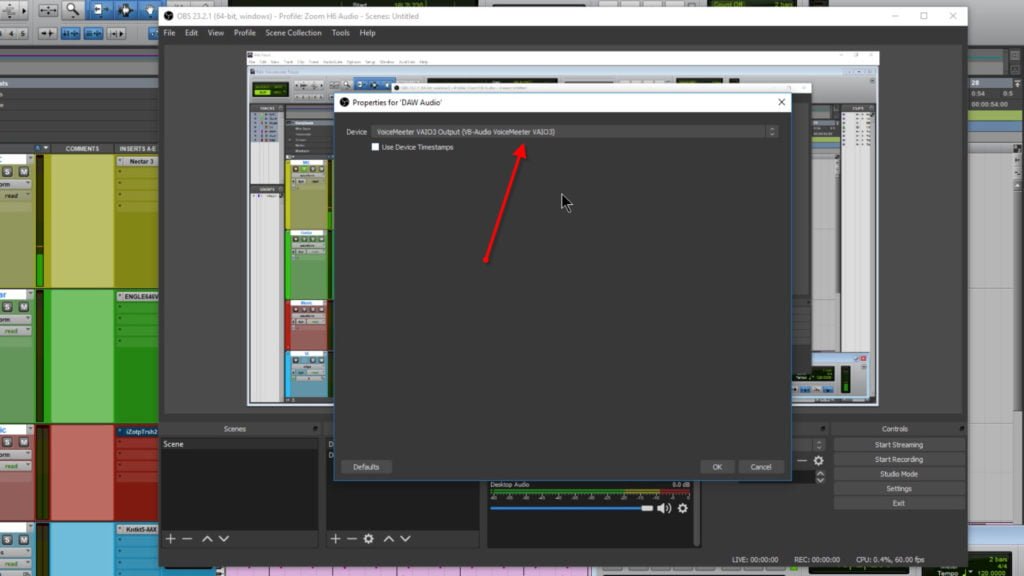
In OBS Studio, create an Audio Input Capture, name it DAW Audio.
Set the input to Voicemeeter VAIO3 Output
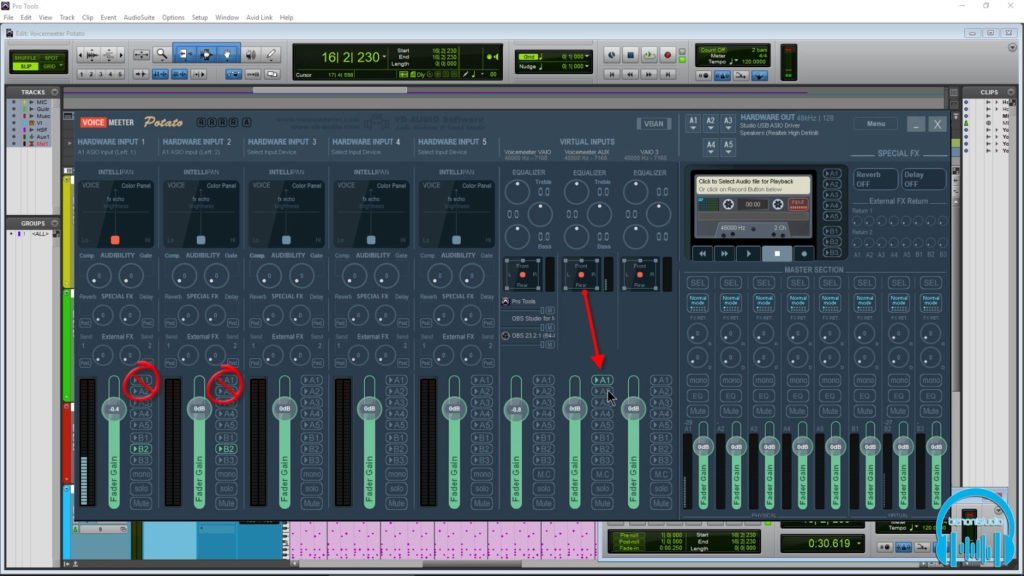
In Voicemeeter, send the DAW audio track to B3

You now have the DAW audio stream in OBS. And it’s separate from the desktop stream.
Now, you can playback audio in your DAW
Use Virtual Instruments
Use plugins
Use the mic and guitar
And, even record in your DAW, and everything that happens in your DAW will be captured in OBS.
Voiceover Mic in OBS
If you want to use a separate microphone for voice-over purposes, that’s not effected by the plugins on the mic track in your DAW, you have a few options. You could route a mic through Voicemeeter, or even use a USB mic. But were going to use another mic plugged into our audio interface and route it directly into OBS.
I have a Shure SM7B plugged into input 3 of our audio interface.
In OBS, create an Audio Input Capture. Name it Microphone.
Set the input, in our case, to 3/4.
You can now see the input.
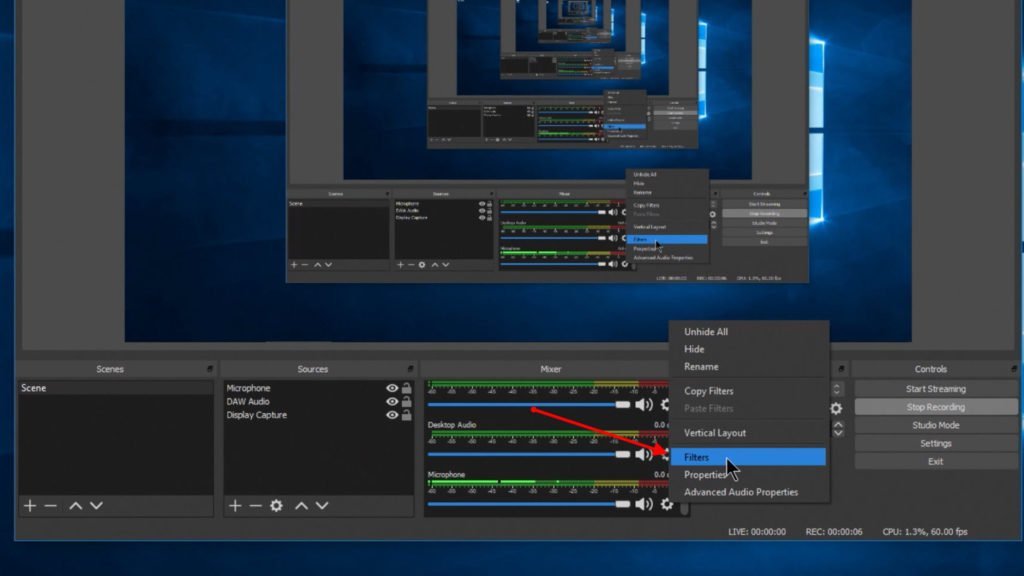
If you want to place VST effects on the microphone track, click the gear icon, and choose Filters.
Choose any of the included effects, or even VST plugins you have installed on your system.
Keep in mind, these effects will be recorded in the mic stream, so don’t use them if you are going to edit later. But they can be useful for streaming.
To hear the effect on your microphone, click the gear icon, and go to Advanced Audio Properties.
For now, downmix the mic to Mono, and Monitor Only the output.
In Voicemeeter, activate A1 for the desktop audio track.
Never mind the latency you hear, this is only for adjusting the plugin, we’ll be using the direct monitor to hear our microphone when streaming or recording. Once you are happy with the sound, close the plugin, and turn the Monitor off. Un-tic Mono, if you wish.
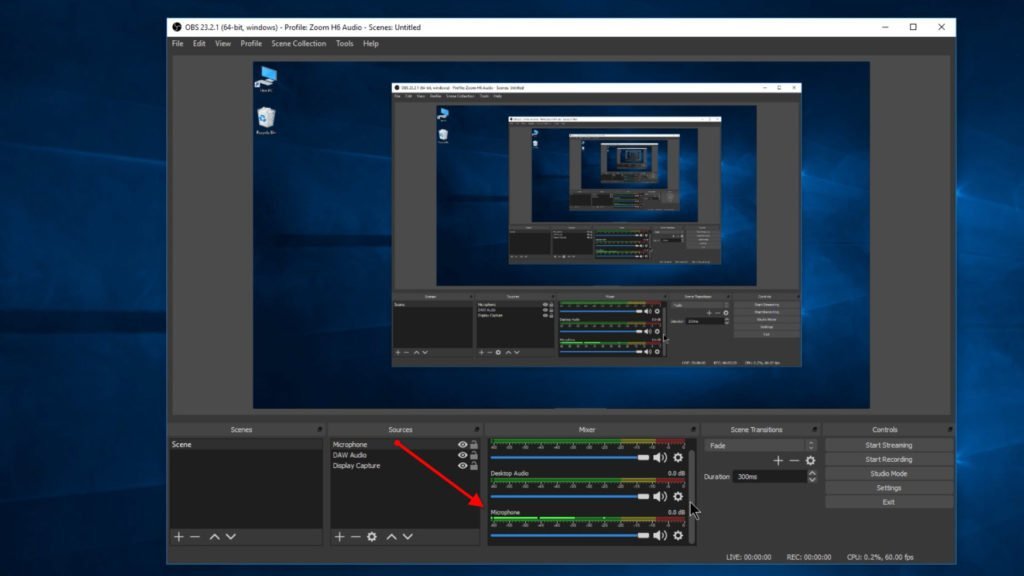
Record Audio to Individual Tracks In OBS (VERY IMPORTAINT!)
If you want to record the audio in OBS to different tracks to edit later, you need to set that up.
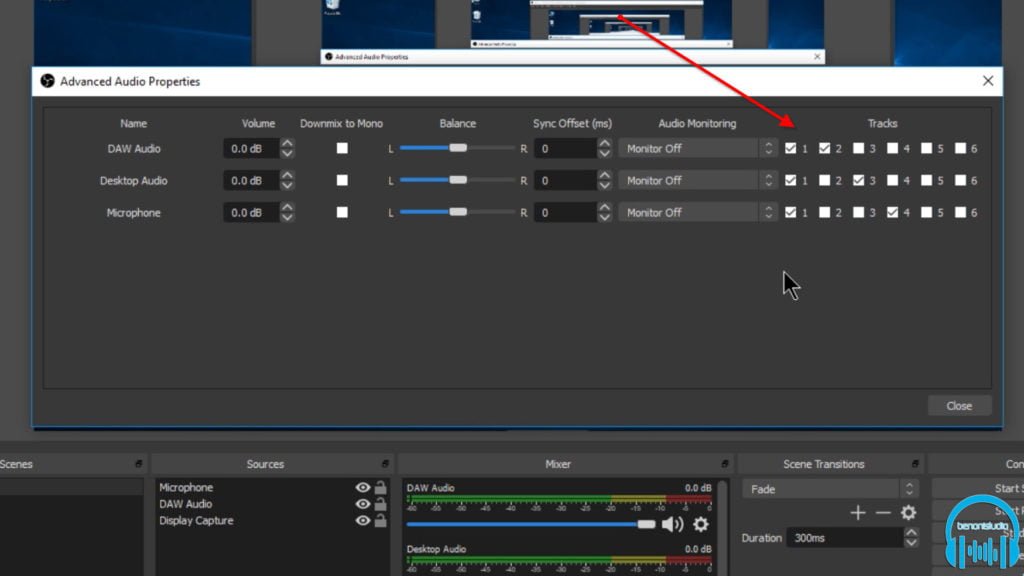
First, click a gear icon next to an audio track and choose Advanced Audio Properties.
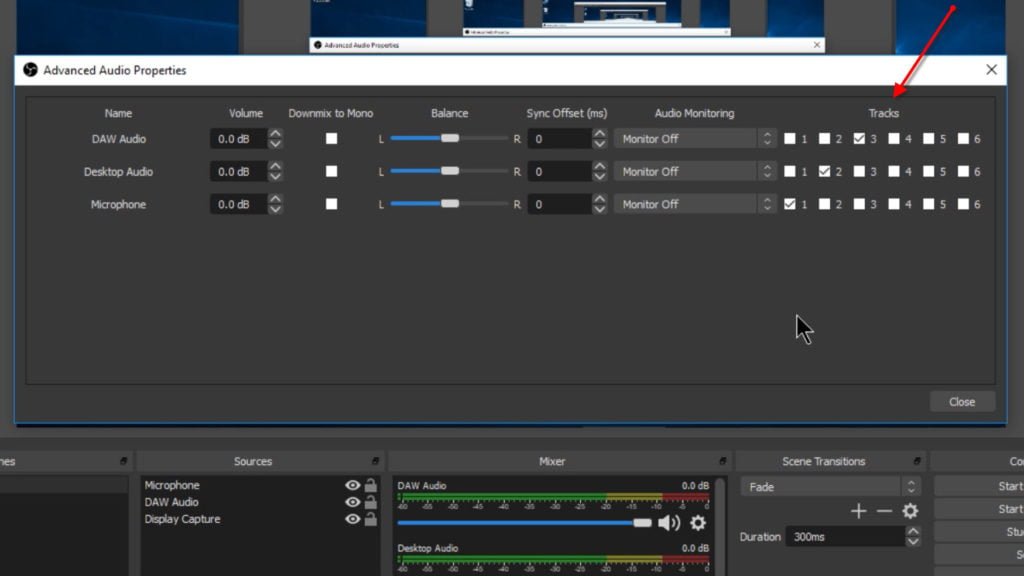
Under TRACKS, un-tick everything for now.
If you are Streaming, you want everything going out of 1. This is because most streams only accept a single stereo track. You could also select 1 for everything if you want a stereo mix of all your audio tracks.
If you are streaming and recording at the same time and you want separate tracks to edit later, set each track to 1 and then separate outputs for each track.
The audio tracks from the recorded video would look like this in a DAW. You can then edit these tracks individually in post.

If you are only recording and you don’t want a stereo mix, just set a different audio track for each source.
You can then edit these tracks later in your DAW
Or video editor

Before hitting record, we need to make sure we are actually recording the individual audio tracks.
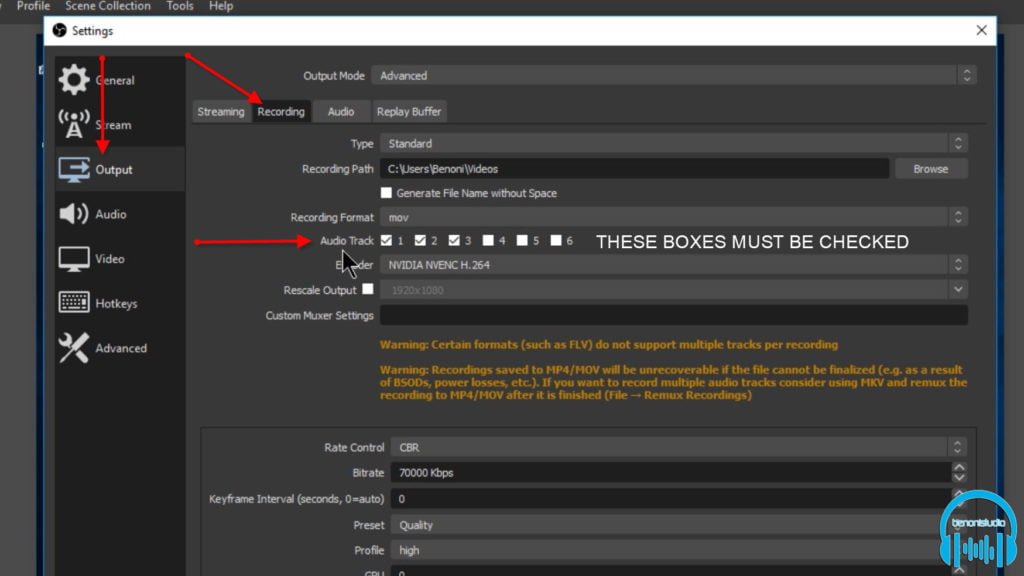
Click Settings and go to Output in OBS Studio.
Go to the Recording tab.
Make sure you check the audio tracks you want recorded with the video. Since we are recording on the first three tracks, I’ll make sure 1, 2, and 3 are checked. These boxes MUST be checked to record individual tracks! Even if you have the tracks checked in Advanced Audio Properties, they WILL NOT be recorded unless you check them in the Recording tab.
Make sure you hit Apply.
Now you are ready to Stream or Record with OBS Studio. Be sure to do a few test streams and test recordings before you do the real thing.
Edit Your Footage
After recording, you may want to edit your footage. You can of course use your favorite video editor for that. But, if you don’t have an NLE, here are some links to free video editors:
Try Streamlabs OBS
Everything I’ve showed in this video also applies to Streamlabs OBS. The interface is a bit different, but it can be setup the same way. Try Streamlabs after getting familiar with OBS Studio.
Record or Stream
And that’s it. There’s a lot more you can do with Voicemeeter and OBS, but now you can make tutorials and demos about a DAW or Plugins. Stream a guitar performance live, podcast from your studio and anything else you can think of.
Screencast your DAW for free, without limits, by using Voicemeeter Potato and OBS Studio or Streamlabs.
TIMECODE
0:00 – Intro
0:36 – The Software
1:17 – Initial Voicemeeter Potato Setup
2:29 – Initial OBS Studio Setup
3:01 – OBS Settings
b: 7:27 – Record a Webcam w/OBS
8:28 – Setup Voicemeeter Potato w/DAW
9:21 – BASIC: Record DAW Audio in OBS
9:55 – ADVANCED: Record DAW Audio w/Inputs in OBS
12:59 – Voiceover Mic in OBS
14:00 – Use Effects on the Mic Track
14:56 – Record Audio to Individual Tracks (VERY IMPORTANT!)
16:58 – Edit Your Footage
17:11 – Try Streamlabs OBS


More Awesome Stuff
Hide Your REAL NAME in FL Studio
How To Removed Copyright Music and Keep the Dialogue
How To Use Retrospective Recording in Studio One 6